General
General, random and useful Linux-related config and things.
A good site to browse random commands and things: https://www.commandlinefu.com/
Apt & Yum Cheat Sheets
Yum
Clear Yum Cache
Nmap
https://phoenixnap.com/kb/nmap-scan-open-ports
# Scan a host
nmap www.hostname.com

# Scan a range
nmap 192.168.0.1-10

# Scan a subnet
nmap 192.168.0.1/24

# Scan a list of hosts
nmap -iL textlist.txt

# Scan a port
nmap -p 80 192.168.0.1

# Scan a range of ports
nmap -p 1-200 192.168.0.1

# Fast scan most common ports
nmap -F 192.168.0.1

# Scan all ports
nmap -p- 192.168.0.1

# Scan using TCP connect (takes longer but more likely to connect)
nmap -sT 192.168.0.1

# Scan default SYN scan (tests by performing only half the TCP handshake)
nmap -sS 192.168.0.1

# Scan UDP ports
nmap -sU -p 80,130,255 192.168.0.1

# Bypass host discovery (host discovery uses ping, but many firewalls don't respond to ping. This runs the test without waiting for ping response)
nmap -Pn -F 192.168.0.1

# Detect OS
nmap -A 192.168.0.1

# Scan for services that might be using different ports
nmap -sV 192.168.0.1
Rsync
https://ss64.com/bash/rsync.html
https://www.computerhope.com/unix/rsync.htm
# rsync without owner and group attributes
rsync -avP --no-o --no-g /mnt/data/share/ /mnt/server3/Backups/

# cronning rsync (https://unix.stackexchange.com/questions/392780/how-to-schedule-an-rsync-command)
crontab -e
  0 19 * * * root rsync -a src dest

# rsync showing progress (https://www.cyberciti.biz/faq/show-progress-during-file-transfer/)
rsync -P src dest

# rsync exclude stuff
rsync -avP --exclude 'file_or_dir' src/ dst/

# rsync exclude from source file list
cat excl-list.txt
  thisdir
  thatdir
  myfile.txt
rsync -av --exclude-from={excl-list.txt}

# stop rsync from bandwidth vreet (https://www.cyberciti.biz/faq/how-to-set-keep-rsync-from-using-all-your-bandwidth-on-linux-unix/)
rsync -avP --bwlimit=KBps
rsync -avP --bwlimit=1024 src/ dst/

# rsync specify multiple source dirs (https://unix.stackexchange.com/questions/368210/how-to-rsync-multiple-source-folders)
rsync -avP /src/one /src/two /src/etcetra /dst
Rsync Compare Directories
https://unix.stackexchange.com/questions/57305/rsync-compare-directories
Smartcl
https://unix.stackexchange.com/questions/39064/smartctl-on-external-hdd-inside-ide-to-usb-enclosure
While Loop
https://stackoverflow.com/questions/1289026/syntax-for-a-single-line-while-loop-in-bash
For Loop
https://unix.stackexchange.com/questions/103920/parallelize-a-bash-for-loop/103922
Moving Files with Spaces
https://unix.stackexchange.com/questions/392393/bash-moving-files-with-spaces
IPv6
Disabling IPv6
https://itsfoss.com/disable-ipv6-ubuntu-linux/
nano /etc/sysctl.conf
  net.ipv6.conf.all.disable_ipv6=1
  net.ipv6.conf.default.disable_ipv6=1
  net.ipv6.conf.lo.disable_ipv6=1
sudo sysctl -p
Fstab
Automounting
# List all UUIDs of drives
blkid

# List all disks
fdisk -l

nano /etc/fstab
  UUID=05cdfcb3-90fc-40ec-8ff1-3324e3767b1d   /media/data ext4    defaults,nofail 0 0
Emergency Mode Bad Fstab
# Put SD card / HDD into another PC
nano /boot/cmdline.txt
  init=/bin/sh

# Put SD card / HDD back into original machine

# Mount FS (but not fstab)
mount -o remount,rw / –target /

# Modify fstab
nano /etc/fstab
  # modify what must be

# Put SD card / HDD into another PC
nano /boot/cmdline.txt
  # delete init=/bin/sh

# Put SD card / HDD back into original machine
Swap
https://www.digitalocean.com/community/tutorials/how-to-add-swap-space-on-ubuntu-20-04
sudo swapon --show
free -h
df -h
sudo fallocate -l 1G /swapfile
sudo chmod 600 /swapfile
sudo mkswap /swapfile
sudo swapon /swapfile
echo '/swapfile none swap sw 0 0' | sudo tee -a /etc/fstab
SSH Config
https://www.ssh.com/ssh/config/
https://www.openssh.com/legacy.html
Example:
cat ~/.ssh/config
  Host server
   LocalForward 2222 192.168.99.99:22
   User ubuntu
   Hostname 192.168.100.1
   IdentityFile ~/.ssh/server
  Host router
   User cisco
   Hostname 192.168.1.1
   IdentityFile ~/.ssh/router
   Ciphers aes256-cbc
  Host switch
   User cisco
   Hostname 192.168.33.2
   Ciphers aes256-cbc
   KexAlgorithms +diffie-hellman-group1-sha1
OpenSSL
# https://stackoverflow.com/questions/5244129/use-rsa-private-key-to-generate-public-key
# Generate public key from private
openssl rsa -in mykey.pem -pubout > mykey.pub
Disk Usage
# Human readable output
du -h mydir/

# Kilobytes
du -k mydir/

# Megabytes
du -m mydir/

# Which sub-dirs consume how much disk space:
du -h --max-depth=1 mydir/ | sort -hr

# List all items including files and dirs
du -ah mydir/

# Multiple dirs
du -h dir1/ dir2/

# Summary
du -sh

# Grand total of dirs
du -sch dir/

# Exclude:
du -sh --exclude='*.docx'
Order by Size
https://www.studytonight.com/forum/how-can-i-sort-du-h-output-by-size
Formatting Disk
# List disks
df -h
fdisk -l

# Unmount disk to format
sudo umount /dev/sdc1

# vFAT, NTFS, EXT4, etc.:
sudo mkfs.vfat /dev/sdc1
sudo mkfs.ntfs /dev/sdc1
sudo mkfs.ext4 /dev/sdc1
ISO to Disk
Check SSL Certificate Expiry Date
https://www.cyberciti.biz/faq/find-check-tls-ssl-certificate-expiry-date-from-linux-unix/
echo | openssl s_client -servername www.calebsargeant.com -connect www.calebsargeant.com:443 | openssl x509 -noout -dates
Inodes
https://stackoverflow.com/questions/24671621/no-space-left-on-device
https://unix.stackexchange.com/questions/117093/find-where-inodes-are-being-used
Mail
https://askubuntu.com/questions/12917/how-to-send-mail-from-the-command-line
Grep
# exclude nologin
grep -wv nologin /etc/passwd

# recursive lookups - https://stackoverflow.com/questions/1987926/how-do-i-grep-recursively
grep -r "texthere" .
Tail
## https://stackoverflow.com/questions/39615142/bash-get-last-line-from-a-variable
# Get last line
tail -n1
SFTP
Pass Variable into SFTP
https://unix.stackexchange.com/questions/228859/how-do-i-pass-a-variable-into-sftp
Curl
Uploading Files
https://ec.haxx.se/usingcurl/usingcurl-uploads
curl https://EXAMPLE \
  -F 'one=sometext' \
  -F 'two=someothertext' \
  -F 'three=somemoretext' \
  -F 'doc=@/Users/caleb/Documents/Test.docx; type=application/vnd.openxmlformats-officedocument.wordprocessingml.document'
Curl to SFTP
https://stackoverflow.com/questions/31730476/curl-fails-on-sftp-password-authentication
TCPDump
https://danielmiessler.com/study/tcpdump/
https://serverfault.com/questions/1025292/how-to-specify-both-ip-address-and-port-in-tcpdump
Get all https traffic:
Get just port 443
Get from specific source:
Dump from an interface:
Putting it all together:
Find
https://askubuntu.com/questions/123305/how-to-find-a-folder-on-my-server-with-a-certain-name
https://www.howtogeek.com/howto/ubuntu/delete-files-older-than-x-days-on-linux/
Screen
Using Screen
https://linuxize.com/post/how-to-use-linux-screen/
List Running Sessions
https://stackoverflow.com/questions/537942/how-to-list-running-screen-sessions
Kill a Detached Session
https://stackoverflow.com/questions/1509677/kill-detached-screen-session
Detatch Session
https://www.tecmint.com/screen-command-examples-to-manage-linux-terminals/#:~:text=Leaving%20Screen%20Terminal%20Session,K%E2%80%9D%20to%20kill%20the%20screen.
Ctrl-A d
Generating SSH Keys
https://askubuntu.com/questions/311558/ssh-permission-denied-publickey
### ON THE CLIENT

# Generate a public key on the client
ssh-keygen -t rsa -b 4096

### Output
#Generating public/private rsa key pair.
#Enter file in which to save the key (/home/ubuntu/.ssh/id_rsa):
#Enter passphrase (empty for no passphrase):
#Enter same passphrase again:
#Your identification has been saved in /home/ubuntu/.ssh/id_rsa.
#Your public key has been saved in /home/ubuntu/.ssh/id_rsa.pub.
#The key fingerprint is:
#SHA256:random

# Copy public key to server (you will be required to authenticate)
ssh-copy-id ubuntu@10.0.2.12

### Output
# /usr/bin/ssh-copy-id: INFO: Source of key(s) to be installed: "/home/ubuntu/.ssh/id_rsa.pub"
# /usr/bin/ssh-copy-id: INFO: attempting to log in with the new key(s), to filter out any that are already installed
# /usr/bin/ssh-copy-id: INFO: 1 key(s) remain to be installed if you are prompted now it is to install the new keys
# ubuntu@10.0.2.12's password:

# Number of key(s) added: 1

# Now try logging into the machine, with:   "ssh 'ubuntu@10.0.2.12'"
# and check to make sure that only the key(s) you wanted were added.

# You can add IdentitiesOnly yes to ensure ssh uses the IdentityFile and no other keyfiles during authentication, which can cause issues and is not a good practice.
vim ~/.ssh/config
  Host SERVERNAME
  Hostname ip-or-domain-of-server
  User USERNAME
  PubKeyAuthentication yes
  IdentityFile ./path/to/key
Sudo without Password
Compression
Gzip
https://linuxize.com/post/how-to-unzip-gz-file/
Zip
Bunzip
Tar
A good source for tar commands https://www.freecodecamp.org/news/tar-in-linux-example-tar-gz-tar-file-and-tar-directory-and-tar-compress-commands/.
.tar
.tar.gz
Tar to CIFS:
# Backup the MySQL database
mysqldump zabbix > backup.sql

# Install cifs-utils
apt-get install cifs-utils

# Create mountpoint dir
mkdir /mnt/data

# Mount the share
mount -t cifs //10.10.10.10/share /mnt/data -o user=administrator

# Archive Zabbix config & DB
tar cfzv backup.tar.gz /etc/zabbix/ backup.sql

# Copy to share
cp backup.tar.gz /mnt/data/
Tar exclude:
https://unix.stackexchange.com/questions/32845/tar-exclude-doesnt-exclude-why
https://unix.stackexchange.com/questions/481993/tar-directory-and-exclude-multiple-subdirectories
PDF to CSV
https://github.com/tabulapdf/tabula-java/releases
TABULARNAME=tabula-1.0.3-jar-with-dependencies.jar
YEAR=2019
MONTH=08
java -jar ./$TABULARNAME -b ./$YEAR/$MONTH -t -p all
Installing GUI on CentOS
yum groupinstall "Desktop" "Desktop Platform" "X Window System" "Fonts"
List Samba Users
pbdedit -L
Open Webpage on Mac
open -a "Google Chrome" index.html
Running FSCK Manually
You get a message: (or something similar) /dev/mapper/vg_fedora1530-lv-home: UNEXPECTED INCONSISTENCY: RUN fsck MANUALLY (i.e., without -a or -p options) Try the following: 1. Type the following commands: umount /dev/sda* fsck /dev/sda1 -f -y -a (see http://www.computerhope.com/unix/fsck.htm for syntax of fsck)
Nginx
Xen
Manually Starting
Install Xen
Mount CD for Image of OS
Install VM
virt-install --prompt (yes centos 512 /home/vm/centos /media/cdrom)
Launch VM to Create Virtual OS
Skel Terminal Colours
mv .bashrc .bashrc.bak
cp /etc/skel/.bashrc .bashrc
nano .bashrc
# uncomment this:
force_color_prompt=yes
# add this to the bottom of the file
[[ -s "$HOME/.rvm/scripts/rvm" ]] && source "$HOME/.rvm/scripts/rvm"
. .bashrc
Move a File Starting with Dash
# https://www.cyberciti.biz/faq/linuxunix-move-file-starting-with-a-dash/
mv -- '--bar.txt' /path/to/dest
LFTP
https://linuxconfig.org/lftp-tutorial-on-linux-with-examples
Rename a File to a Filename with Date
cp <name_of_file> <new_name_of_file>.`date -I`
Checking CPU Architecture
uname -i
Checking Uptime
uptime
Crontab different editor
https://www.linux.org/threads/set-your-default-editor-for-things-like-crontab-visudo-etc.5046/
TigerVNC
yum install vnc vnc-server tigervnc-server xterm
yum groupinstall Desktop

useradd <UserNameHere>
passwd <UserNameHere>

vi /etc/sysconfig/vncservers
  VNCSERVERS="1:<user1> 2:<user2> 3:<user3>"
  VNCSERVERARGS[1]="-geometry 640x480"
  VNCSERVERARGS[2]="-geometry 640x480"
  VNCSERVERARGS[3]="-geometry 800x600"

# Remember to delete the nonsense after: <resolution>"

su - <username>
vncpasswd
service vncserver start

# To connect to a Windows machine, install tiger-vnc on the Windows machine and enable Remote Desktop. Allow RDP 3389 through firewall.
Old School LAMP
Features
- Apache (hosts the website)
- MySQL (Database server)
- PHP (hypertext processor)
- Joomla (creates the website. Dependant on PHP and MYSQL)
Installation
My SQL Server 5.0 (server & client)
yum install mysql mysql-server
chkconfig --levels 235 mysqld on
/etc/init.d/mysqld start
mysql_secure_installation
Apache 2
(http://xxx.xxx.xxx) (Apache's default document root is /var/www/html on CentOS, and the configuration file is /etc/httpd/conf/httpd.conf. Additional configurations are stored in the /etc/httpd/conf.d/ directory)
PHP5
MySQL Support for PHP5
(http://xxx.xxx.xxx.xxx/info.php)
yum search php
yum install php-mysql php-gd php-imap php-ldap php-mbstring php-odbc php-pear php-xml phpxmlrpc
yum install php-pecl-apc
/etc/init.d/httpd restart
phpMyAdmin
(http://xxx.xxx.xxx.xxx/phpmyadmin/)
rpm --import http://dag.wieers.com/rpm/packages/RPM-GPG-KEY.dag.txt

# 64-bit:
yum install http://pkgs.repoforge.org/rpmforge-release/rpmforge-release-0.5.2-2.el6.rf.x86_64.rpm

# 32-bit
yum install http://pkgs.repoforge.org/rpmforge-release/rpmforge-release-0.5.2-2.el6.rf.i686.rpm

yum install phpmyadmin
vi /etc/httpd/conf.d/phpmyadmin.conf
  #
  # Web application to manage MySQL
  #
  #<Directory "/usr/share/phpmyadmin">
  # Order Deny,Allow
  # Deny from all
  # Allow from 127.0.0.1
  #</Directory>
  Alias /phpmyadmin /usr/share/phpmyadmin
  Alias /phpMyAdmin /usr/share/phpmyadmin

vi /usr/share/phpmyadmin/config.inc.php
  [...]
  /* Authentication type */
  $cfg['Servers'][$i]['auth_type'] = 'http';
  [...]

/etc/init.d/httpd restart
Joomla!
If you are installing LAMP without Joomla then skip all the commands that have anything to do with Joomla.
cd /tmp
yum install wget
wget joomlacode.org/gf/download/frsrelease/17715/77262/Joomla_2.5.8-Stable-Full_Package.zip
mkdir /tmp/joomla
unzip Joomla_2.5.8-Stable-Full_Package.zip /tmp/joomla/
mv /tmp/joomla/* /var/www/html/
service mysqld start; chkconfig mysqld on
/usr/bin/mysql_secure_installation
yum --enablerepo=epel install phpmyadmin

vi /etc/httpd/conf.d/phpMyAdmin.conf
  Allow from 127.0.0.1 xxx.xxx.xxx.xxx/24

iptables -I INPUT -p tcp --dport http -j ACCEPT ; service iptables save ; service iptables restart

vi /etc/php.ini
  output_buffering=Off

touch /var/www/html/configuration.php
chmod 666 /var/www/html/configuration.php
service httpd start; chkconfig httpd on

mysql -u root -p
  create database <db_name_here>
  create user 'root'@'localhost' identified by '<password_here>';
  grant all privileges on <db_name_here>.* to root@localhost;
  show grants for 'root'@'localhost';
Open up a web browser and type in http://xxx.xxx.xxx. Follow the wizard. REMEMBER TO COPY CONFIGURATION TEXT TO /var/www/html/configuration.php. rm -rf /var/www/html/installation/ You can access the server by going to a browser and typing http://xxx.xxx.xxx/administrator.
Git Server
On the Server
Installing Git
Configuring the git group
For a new user:
For an existing user:
Configuring the Git Server Repository
mkdir /path/to/gits
cd /path/to/gits
mkdir project.git
cd project.git
git init --bare --shared=group
sudo chmod -R g+ws *
sudo chgrp -R git *
Configuring the Git Hook for Web code
mkdir /var/www/html/project
cd /path/to/gits/project.git
vi /hooks/post-recieve
#!/bin/sh
GIT_WORK_TREEE=/var/www/html/project git checkout -f
chmod +x hooks/post-receive
chown -R git:git *
On the Client's Machine
Download and install: https://git-scm.com/download/win
mkdir /path/to/gits
cd /path/to/gits
mkdir project.git
cd project.git
git init
git remote add web ssh://<HostnameOrIP>/full/path/to/project.git
git add README
git commit -m "Initial Import"
git push web +master:refs/heads/master
Then open Firefox, go to \<HostnameOrIP>/project Then in future: git push web
Please note that you wont see any files on the server, because it is a bare repository and therefore the files are protected. You can create a Git Hook to expose the bare repository's files in a different directory (useful for web code). Use git clone
Age of System
ubuntu@server:~$ sudo tune2fs -l /dev/sda2 | grep created
Filesystem created:       Mon Sep  7 06:49:22 2020
List all Services
https://www.tecmint.com/list-all-running-services-under-systemd-in-linux/
Temporary Failure in Name Resolution
https://stackoverflow.com/questions/53687051/ping-google-com-temporary-failure-in-name-resolution
sudo systemctl disable systemd-resolved.service
sudo systemctl stop systemd-resolved.service
sudo rm /etc/resolv.conf
echo "nameserver 1.1.1.1" > /etc/resolv.conf
echo "nameserver 1.0.0.3" >> /etc/resolv.conf
Change Hosname
https://www.cyberciti.biz/faq/ubuntu-20-04-lts-change-hostname-permanently/
Google Authenticator
CentOS 7
# Update and Upgrade
yum -y update && yum -y upgrade

# Install FreeRADIUS
yum install freeradius freeradius-utils

# Install nano
yum install nano

# Make root the user
nano /etc/raddb/radiusd.conf

user = root
group = root

# Enable PAM
nano /etc/raddb/sites-enabled/default

# Pluggable Authentication Modules.
pam

ln -s /etc/raddb/mods-available/pam /etc/raddb/mods-enabled/pam

# Add the RADIUS clients
nano /etc/raddb/clients.conf

client asa {
ipaddr = 10.145.16.3
secret = supersecuresecret
nas_type = cisco
}

# Change auth type
nano /etc/raddb/users

DEFAULT Group == "disabled", Auth-Type := Reject

Reply-Message = "Your account has been disabled."

DEFAULT Auth-Type := PAM

# Reload radiusd
service radiusd restart

# Test RADIUS, look for any errors
radiusd -X

# Test RADIUS without LDAP or Google Auth
useradd raduser
passwd raduser

radtest raduser Password1 localhost 0 testing123

# Installing tools to add box to domain
yum install sssd realmd adcli oddjob oddjob-mkhomedir sssd samba-common-tools

# Make computer join the domain
realm join corp.domain.com -U caleb.sargeant

# Configure SSSD
nano /etc/sssd/sssd.conf

ad_domain = corp.domain.com
krb5_realm = CORP.DOMAIN.COM
realmd_tags = manages-system joined-with-samba
cache_credentials = True
id_provider = ad
krb5_store_password_if_offline = True
default_shell = /bin/bash
ldap_id_mapping = True
use_fully_qualified_names = False
fallback_homedir = /home/%u
access_provider = simple
simple_allow_groups = test-group

# Allow only users part of test-group to auth with radius server
realm permit -g test-group

### SSH into the box with caleb.sargeant@ct-googleauth - not needed anymore, become the user via su only

# Reload radiusd & SSSD
service radiusd restart
service sssd restart

# Test RADIUS with LDAP, without Google Auth
radiusd -X

radtest caleb.sargeant <Password> localhost 0 testing123

# Install stuff for Google Authenticator
yum install pam-devel make gcc-c++ git wget

# Installing Google Authenticator
cd /tmp
wget https://dl.fedoraproject.org/pub/epel/7/x86_64/Packages/g/google-authenticator-1.04-1.el7.x86_64.rpm
rpm -i google-authenticator-1.04-1.el7.x86_64.rpm

# Configuring Google Authenticator for a user
su - caleb.sargeant
google-authenticator
### say y for everything, backup the numbers!

# Add Google Authenticator to PAM
nano /etc/pam.d/radiusd
#%PAM-1.0
auth requisite pam_google_authenticator.so forward_pass
auth required pam_sss.so use_first_pass
account required pam_nologin.so
account include password-auth
session include password-auth

# Test RADIUS with LDAP and Google Auth
radtest caleb.sargeant <Password><GoogleAuthCode> localhost 0 testing123

# Disable SELinux
nano /etc/selinux/config
SELINUX=disabled

# Configuring firewall
firewall-cmd --get-default-zone
firewall-cmd --zone=public --list-all
firewall-cmd --get-services | grep rad
firewall-cmd --permanent --zone=public --add-service=radius
firewall-cmd --reload
Cisco AnyConnect Connection
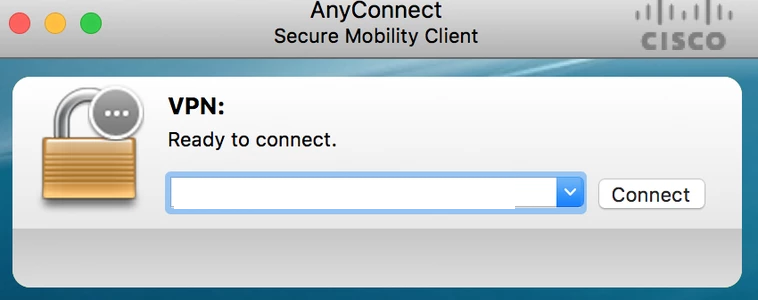
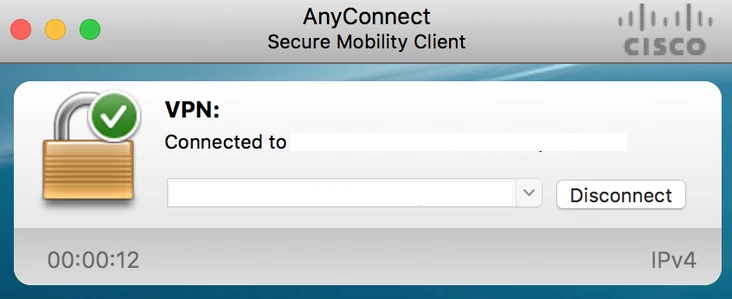
The below guide shows one how to connect to the VPN using one's OTP. The connection is exactly the same as the previous VPN connection.
- To connect to the VPN using MFA, first connect to your region.
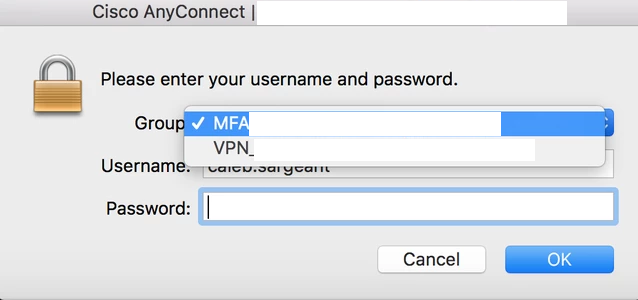
- Select the MFA Group.
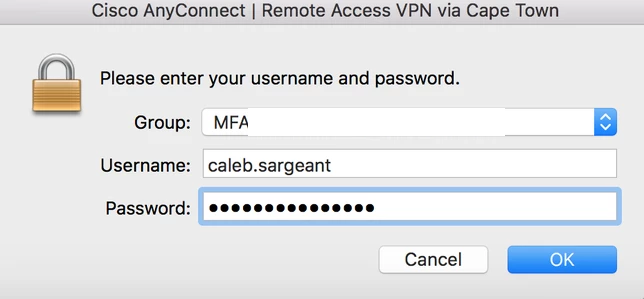
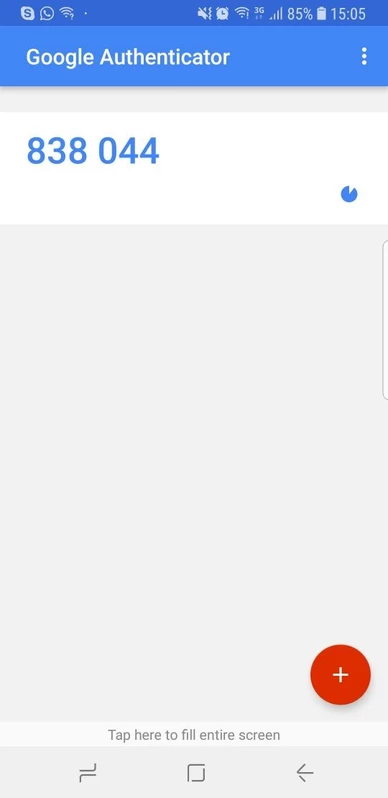
- Enter your credentials. Once you have finished typing in your password, enter your TOTP. In this example, I will be using Google Authenticator on Android. The format is YOURPASSWORD-OTP (without the "-").
- You will be connected to the VPN as per normal.
LDAP Authentication
Public Key Authentication
First, on the host, reset the password of ubuntu & root
Modify the sudoers file, so that we don't have type in the password to become root. DO NOT make a mistake here.
On your laptop, copy the sshkey to the host
You can now log into the host using ubuntu & the key.
SSSD
Modify the sudoers
# Add Infrasturcture Team to Sudoers
nano /etc/sudoers.d/ad-ldap
  %Infrastructure\ Team ALL=(ALL:ALL) NOPASSWD:ALL

# Change permissions on sudoers file to Owner & Group readable only
chmod 440 /etc/sudoers.d/ad-ldap
Install SSSD & Related Tools
apt-get install samba-common sssd sssd-tools realmd adcli oddjob oddjob-mkhomedir libnss-sss libpam-sss adcli -y
Join the domain
SSSD Configuration
# Add or modify the below
nano /etc/sssd/sssd.conf
  use_fully_qualified_names = False
  fallback_homedir = /home/%u
  skel_dir = /etc/skel
  homedir_umask = 000
  override_homedir = /home/%u
  simple_allow_groups = Infrastructure\ Team
Restart SSSD
You can now log in to the host using your domain credentials
To add Duo Authentication push notifications, see here.
Gcloud
Installation
curl https://sdk.cloud.google.com | bash
# The next line updates PATH for the Google Cloud SDK.
source '[path-to-my-home]/google-cloud-sdk/path.bash.inc'
# The next line enables bash completion for gcloud.
source '[path-to-my-home]/google-cloud-sdk/completion.bash.inc'
Find the PID Using Port
https://unix.stackexchange.com/questions/106561/finding-the-pid-of-the-process-using-a-specific-port
Unmounting a Busy Device
https://stackoverflow.com/questions/7878707/how-to-unmount-a-busy-device
Ubuntu Resize Logical Volume
vgdisplay
lvextend -l +100%FREE /dev/mapper/ubuntu--vg-ubuntu--lv
resize2fs /dev/mapper/ubuntu--vg-ubuntu--lv
Wget
Download a list of files
https://stackoverflow.com/questions/40986340/how-to-wget-a-list-of-urls-in-a-text-file
Cat & Tac
https://stackoverflow.com/questions/742466/how-can-i-reverse-the-order-of-lines-in-a-file
WC
https://www.baeldung.com/linux/bash-count-lines-in-file#:~:text=3.-,wc,the%20name%20of%20the%20file.
Decrypt GPG
https://www.cyberciti.biz/tips/linux-how-to-encrypt-and-decrypt-files-with-a-password.html
Forget GPG Invalid Password
List DNS Servers Ubuntu
https://askubuntu.com/questions/152593/command-line-to-list-dns-servers-used-by-my-system
Install WireGuard VPN Client
https://serverspace.io/support/help/how-to-install-wireguard-vpn-client-on-ubuntu-linux/
sudo apt-get install wireguard
cd /etc/wireguard
wg genkey | tee private.key | wg pubkey > public.key
sudo nano /etc/wireguard/wg0.conf
  [Interface]
  PrivateKey = <contents-of-client-privatekey>
  Address = 10.0.0.1/24
  PostUp = iptables -A FORWARD -i wg0 -j ACCEPT; iptables -t nat -A POSTROUTING -o eth0 -j MASQUERADE
  PostDown = iptables -D FORWARD -i wg0 -j ACCEPT; iptables -t nat -D POSTROUTING -o eth0 -j MASQUERADE
  ListenPort = 51820

  [Peer]
  PublicKey = <contents-of-server-publickey>
  AllowedIPs = 10.0.0.2/32

sudo wg-quick up wg0
sudo wg show
Install Docker on Amazon Linux 2
https://www.cyberciti.biz/faq/how-to-install-docker-on-amazon-linux-2/