Mikrotik
First Time Setup
Securing the Router
- Disable wireless if not using it
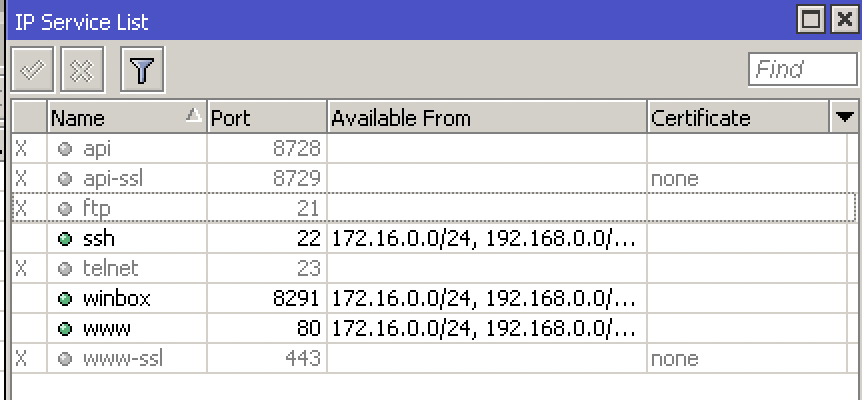
- IP > Services (disable telnet and stuff, only allow certain addresses)
- System > Password (change the password)
- System > Users > double click on the user and set the allowed addresses
Configuring the Bridge
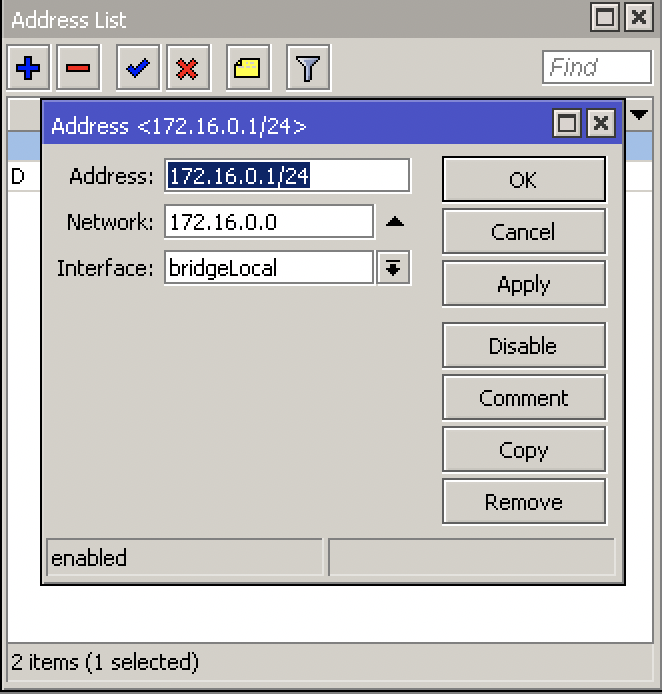
- IP > Addresses (giving the bridge an address that will be used as gateway)
Configuring the Outside Interface
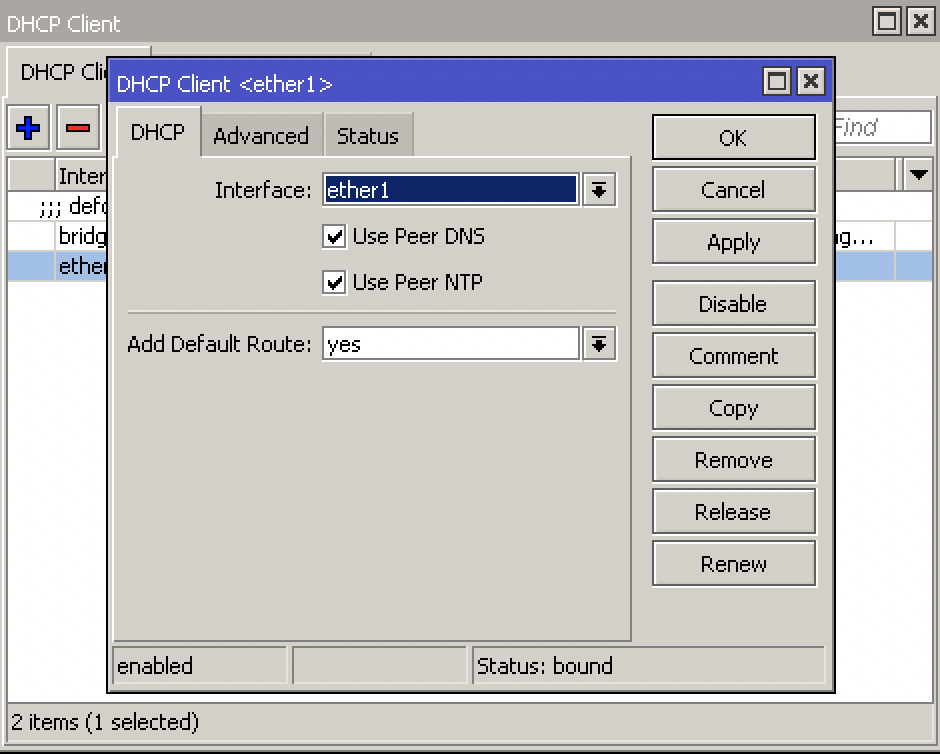
- Disable ether1 in Bridge
- IP > DHCP Client
Configuring DHCP Server for Clients
- IP > DHCP Server > DHCP Setup
- DHCP Server Interface: bridgeLocal
- DHCP Address Space: 172.16.0.0/24
- Gateway for DHCP Network > 172.16.0.1
- DHCP Relay > delete this
Configure NAT
- IP > Firewall > NAT
- Chain: srcnat
- Action: masquerade
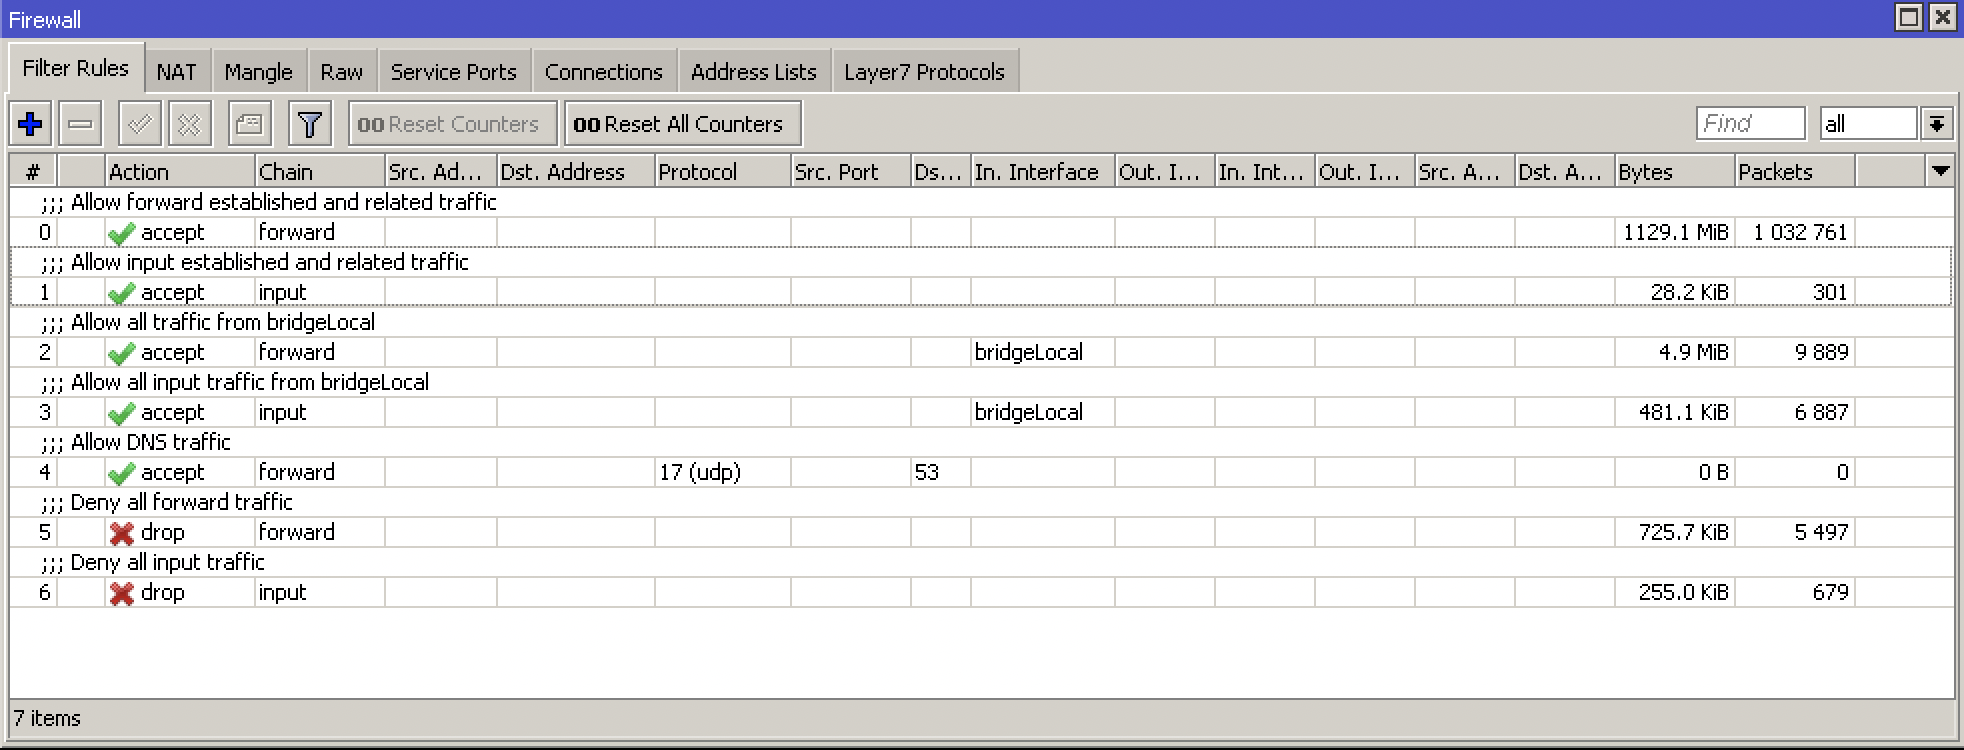
Deny Catch all Firewall Rules
Upgrading the Router
- System > Packages > Check For Updates > Download&install
Upgrading the Firmware
- System > RouterBOARD > Upgrade
- System > Reboot
Setting the Identity
- System > Identity
Users & Groups & SSH Keys
- System > Users (here you can admin all your users nad groups, give read only access, etc.)
- For SSH keys upload your private key file that you generated
- Allow/Deny SSH password Login to disable/enable ssh key login only
HTTPS Access to Router
- System > Certificates
- Country: ZA
- Key Size: 2048
- Days Valid: 365
- Key Usage: tls server
- Sign
- IP > Services > enable www-ssl and select the certificate
Backup and Restore
- Files > Backup
system backup save encryption=aes-sha256 name=backup

# or (takes a lot of load)
export
export file=export
- Files > Restore
Resetting Router
- Press the reset button until the light stops flashing by unplugging the power, holding the button and powering on
- System > Reset Configuration
Netinstall
- Only works on ether1
- Formats the drive, keeps license key and RouterBOOT settings
- Download Netinstall from Mikrotik site and open it
- Click Net booting > boot server enabled > put in IP Address of router
Licensing
- System > License
- https://wiki.mikrotik.com/wiki/Manual:License
DHCP
- Discover: broadcast takes place over network
- Offer: the server offers the client a lease
- Request: client requests the lease from the server
- Acknowledge: server sends client ack for the lease
IP > DHCP Server > DHCP Setup
ARP
- ARP Request: gets broadcast to find out who the ip address of the mac address is of the ip address
- Server puts the clients mac address and ip address in its arp table and replies to client
- Mikrotik recommends setting your interface arp to reply-only so that it doesnt learn new arps from anywhere else
IP > ARP
Bridging
- Ports in a bridge behave as a switch at layer 2
Bridge
Station Mode
- Interfaces > wlan1 > mode: station bridge
- Scan and select the WLAN you want to connect to
- this will allow one router to connect to the other one wirelessly: ISP \<-> R1 \<-> wifi \<-> R2 \<-> PC
Routing
-
Exterior Gateway Protocol (EGP):
- BGP
-
Interior Gateway Protocols (IGP):
- RIP
- IGRP (Cisco)
- EIGRP (Cisco)
- OSPF
- IS-IS
IP > Routes
Tunneling / VPN
What is VPN?
Private WAN:
- Secure
- Confidential
- But expensive
Alternative to private WAN is the internet. However, the internet is unsecure and we need a VPN protocol to run to have a secure data transfer from A to B
VPN Features:
- Confidentiality: preventing anyone from reading your data using encryption protocols
- Authentication: verifying that the router/firewall or remote user that is sending VPN traffic is a legitimate device or router
- Integrity: verifying that the VPN packet wasn't changed during transit
- Anty-replay: preventing someone from capturing traffic and resending it, trying to appear as a legitimate device/user
IKEv2 IPSec
-
All configuration is done under IP > IPsec
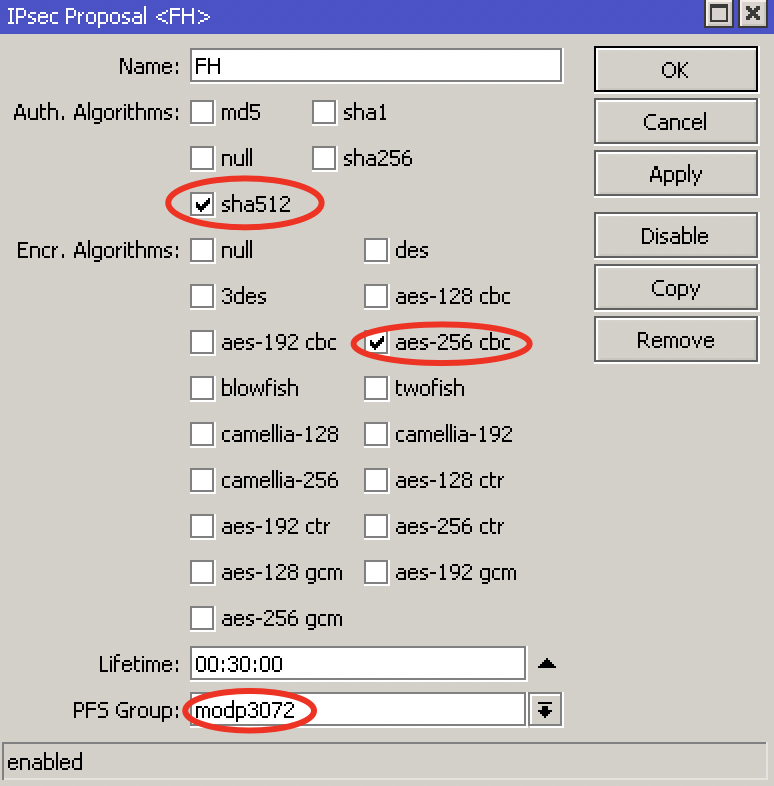
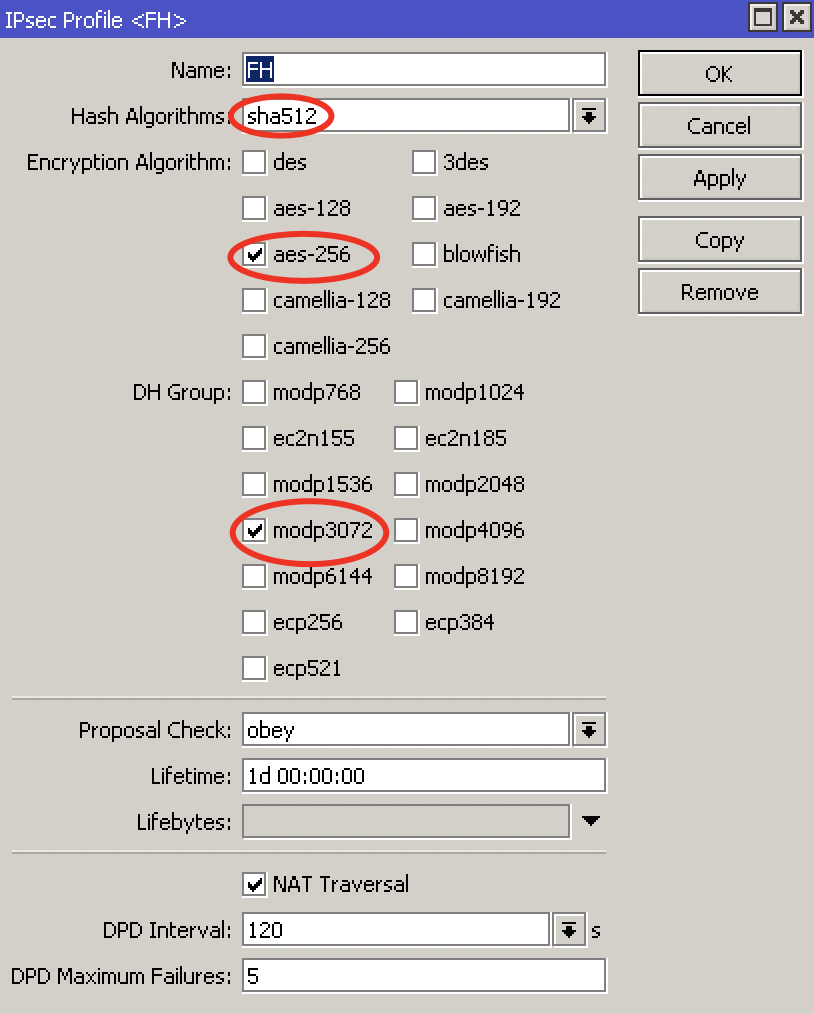
- Note, according to this Cisco document (https://tools.cisco.com/security/center/resources/next_generation_cryptography), the following algorithms are acceptable:
- Authentication: sha384 (384 wasnt available in the below example)
- Encryption: aes-256 cbc
- Hashing: sha384
- DH group: modp3084
Proposal
Select the auth. Algorithm and encr. Algorithm thats NGE acceptable.
Profile
Select the Hash Algorithm, Encryption Algorithm and DH group thats NGE acceptable.
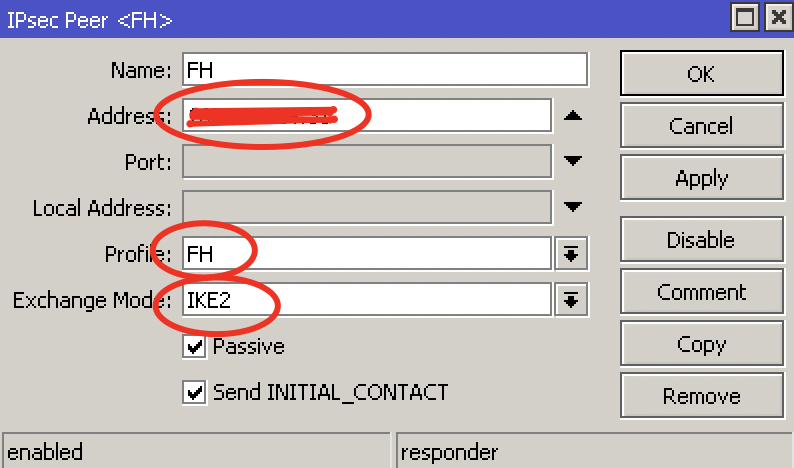
Peer
Enter the peer address, select the profile you created and set the exchange mode to IKEv2
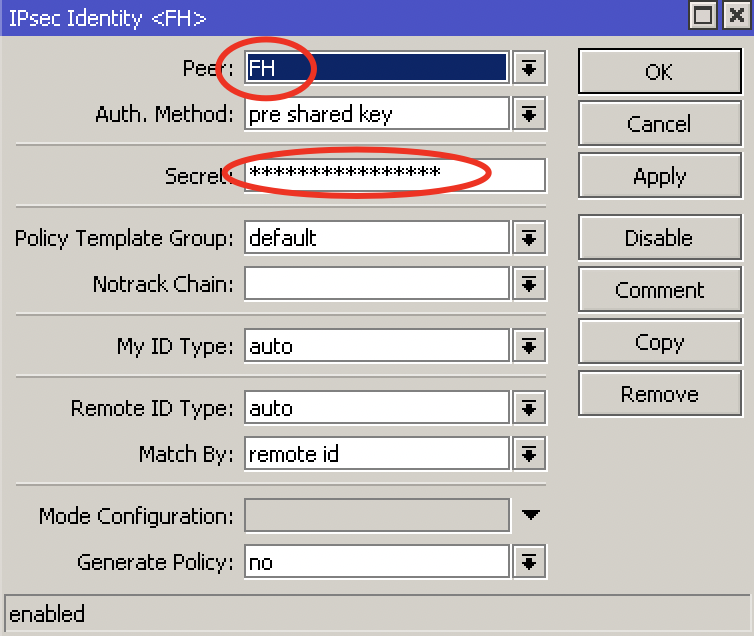
Identities
Set a PSK and select the correct peer you created.
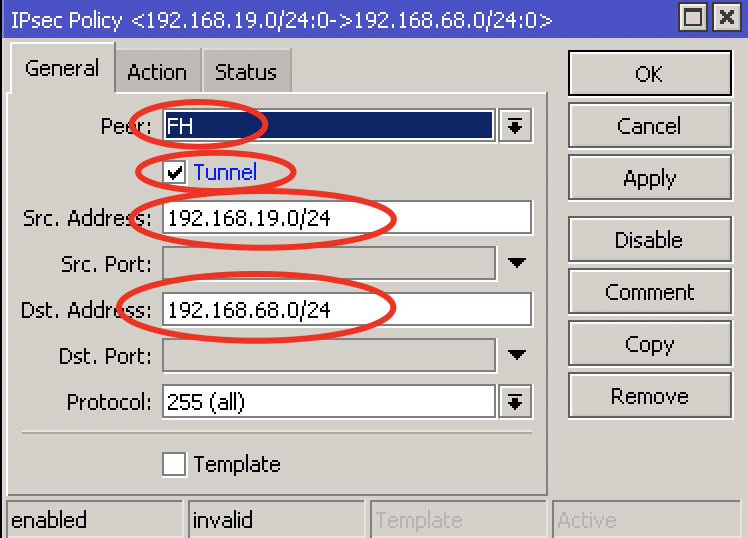
Policy
Select the peer you created, set the source and dest addresses, check tunnel.
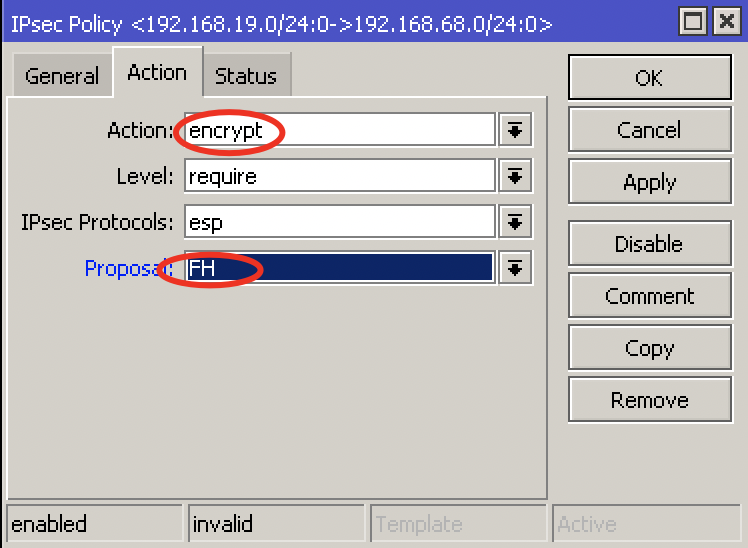
Action encrypt:
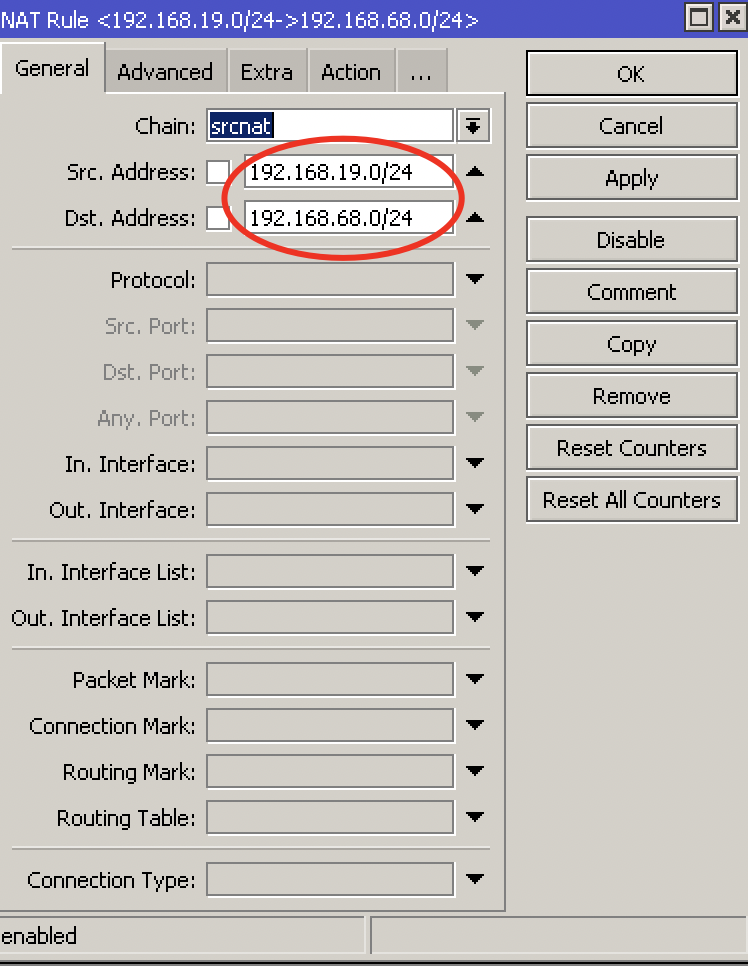
Firewall & NAT
Create a srcnat rule with action accept to no-nat the traffic. Put this rule on top.
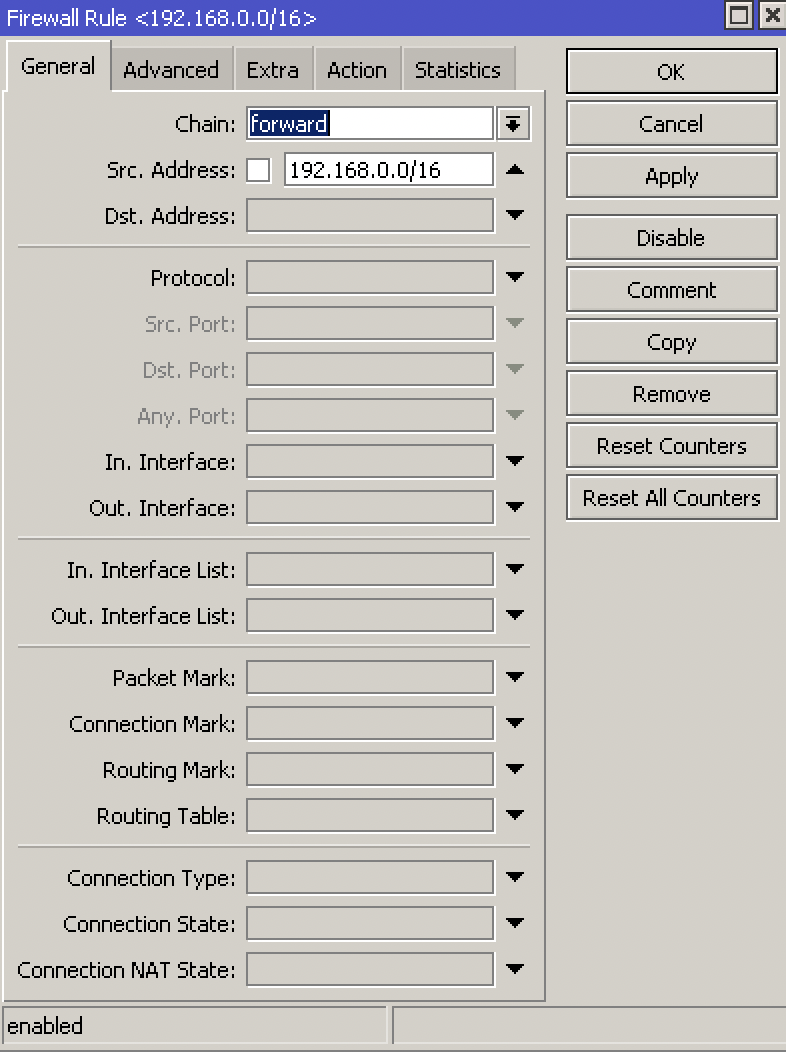
Create a firewall rule to allow the traffic. Action accept, chain forward.
PPTP
What is PPTP:
- PPTP means Point-to-Point Tunneling Protocol
- PPTP was introduced in 1995
- PPTP is considered a weak VPN protocol in terms of security
- PPTP uses port 1723 to establish a peer connection and uses port 47 (GRE)
- On Mikrotik, PPTP supports site to site and client to site VPN tunneling
Advantages:
- Easy configuration
- Very fast VPN protocol
- Available on most platforms
Disadvantages:
- PPTP encryption is weak
- A PPTP connection can be exploited by cybercriminals with malicious attacks
- A PPTP connetion can be blocked quite easily by firewalls
- A router with PPTP passthrough is usually required since PPTP doesn't natively work with NAT
Site to Site Configuration:
- On the main router:
- PPP > Interface > PPTP Server
-
PPP > Secrets > +
- Name: put a name here
- Password: put a password here
- Profile: select the default-encryption profile or a profile you created
- Local address: the local address of your router
- Remote address: the local address of the other router
- On the branch router:
-
PPP > Interface > + > PPTP Client > Dial Out
- Connect to: public IP of main router
- User: the username
- Password: the password
- Add a route to the local network on each router (IP > Route)
L2TP Site-to-Site
On your main router:
-
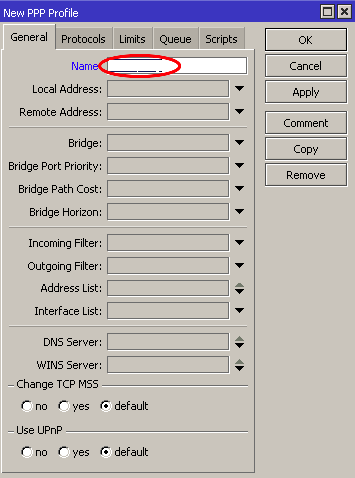
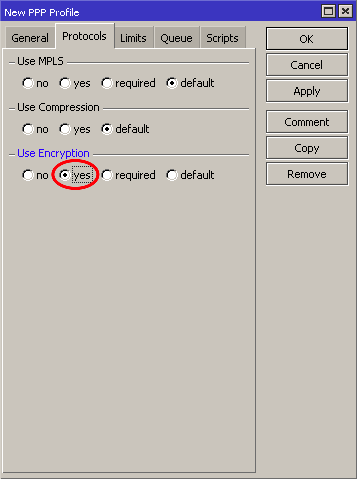
Create the PPP Profile
- PPP > Profiles
- Name: Put the name of the ppp profile
- Protocols tab > Use Encryption: yes
-
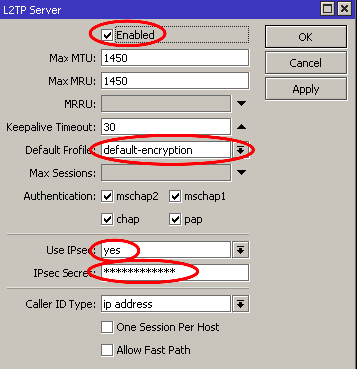
Enabling L2TP Server with IPSec
- PPP > Interface > L2TP Server
- Click enabled
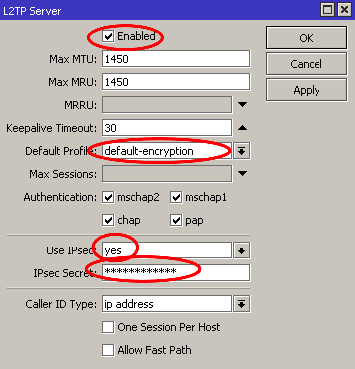
- Use IPsec: yes
- Enter IPsec Secret (this is the PSK that will be for client-to site and site-to-site connections, because we must use one profile for both configurations)
-
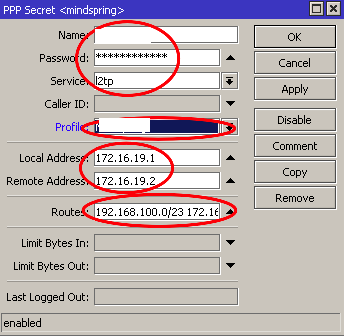
PPP User Configuration
- PPP > Secrets
- User: username
- Password (put in password that will be used by the client - not the same as the PSK we setup above)
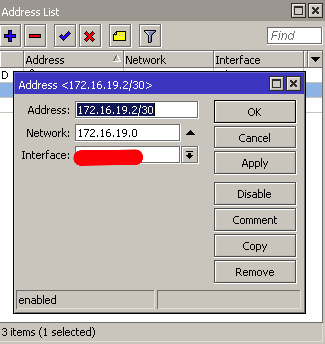
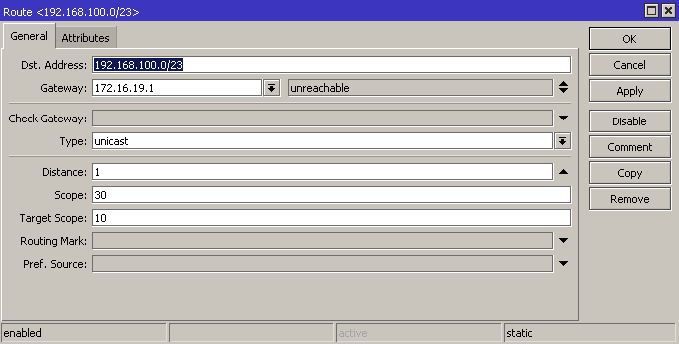
- Local Address: 172.16.19.1 (or any local IP address)
- Remote Address: 172.16.19.2 (or any local address that can reach local address)
- Routes: put in static route, for example: 192.168.100.0/23 172.16.19.2
On your other router:
-
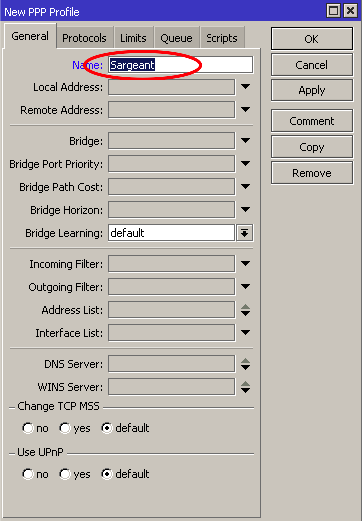
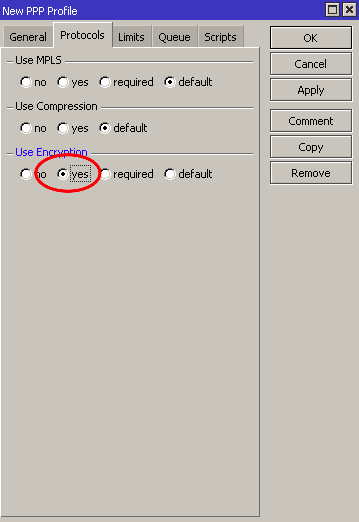
Create the PPP Profile
- PPP > Profiles
- Name: Put the name of the ppp profile
- Protocols tab > Use Encryption: yes
-
L2TP Client Configuration
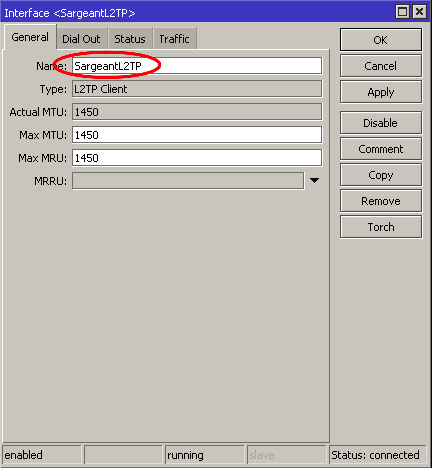
- Interfaces > + > L2TP Client
-
General:
- Name: enter name of interface
-
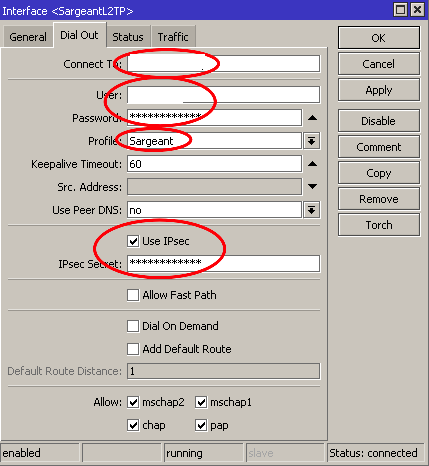
Dialout:
- Connect To: public IP Address of main router
- User: user
- Password: put in your users password
- Profile: select the profile you created
- Use IPsec
- IPSec secret: enter your ipsec secret
-
Static Router Configuration
- IP > Routes
- DST Address: remote subnet
- Gateway: name of your L2TP interface
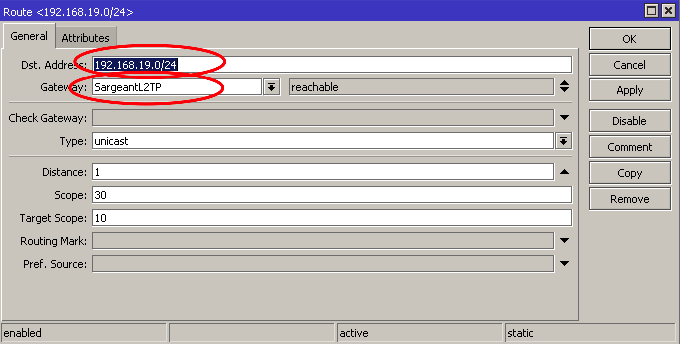
L2TP Client-to-Site
Pool
- IP > Pools > create IP pool
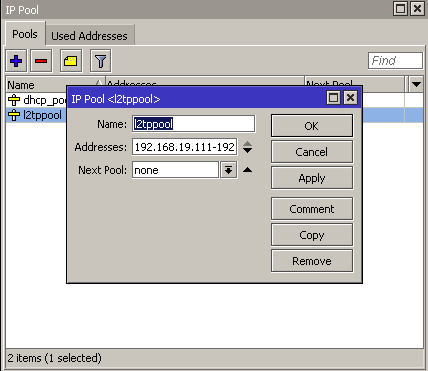
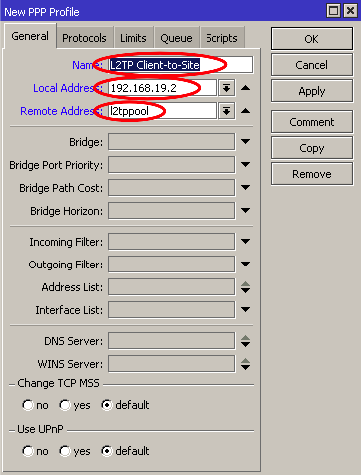
L2TP Profile
-
PPP > Profiles:
- Name: L2TP Client-to-Site
- Local Address: the local address of your router
- Remote Address: l2tppool
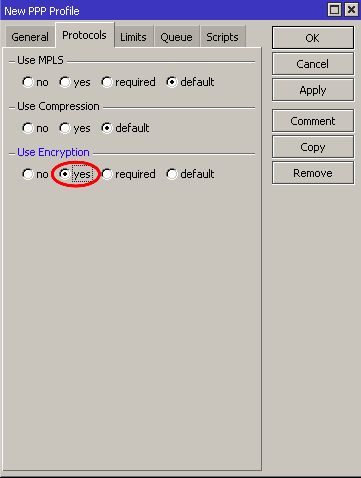
L2TP Server
- PPP > Interface > L2TP Server
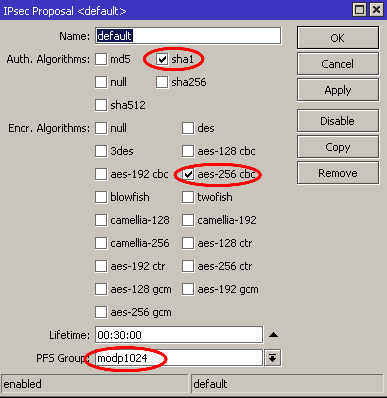
IPSec Proposal
- IP > IPsec > Proposals
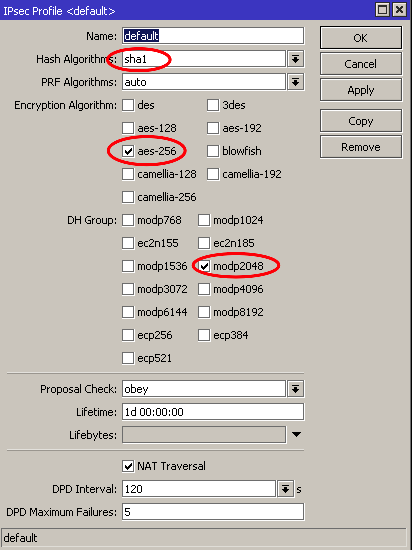
IPSec Profile
- IP > IPsec > Profiles
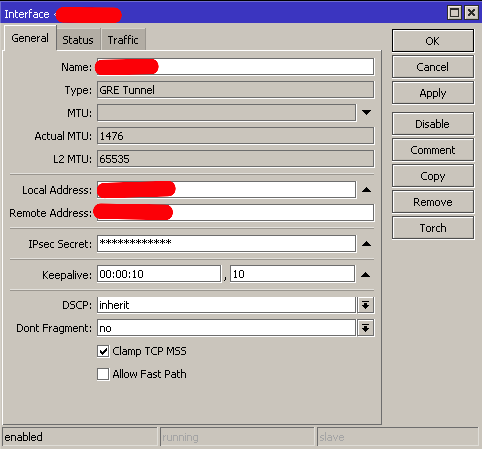
GRE IPSec
SSTP
What is SSTP:
- SSTP means Secure Socket Tunneling Protocol
- SSTP is a VPN protocol developed my Microsoft and introduced by them with Windows Vista
- SSTP is considered a safe VPN Protocol
- SSTP uses TCP port 443 - the same port used by HTTPS traiffic
- SSTP can bypass NAT firewalls
- On Mikrotik, SSTP supports site to site and client to site VPN tunneling
Advantages:
- SSTP encryption offers a decent level of security
- Easy configuration
- Very difficult to block SSTP because it uses TCP port 443 (same as HTTPS)
- Very stable
Disadvantages:
- SSTP protocol clients are available on limited number of platforms (Windows, Android, etc.)
- Possible TCP meltdown problem
Site to Site Configuration:
- On the main router:
- PPP > Interface > SSTP Server
-
PPP > Secrets > +
- Name: put a name here
- Password: put a password here
- Profile: select the default-encryption profile or a profile you created
- Local address: the local address of your router
- Remote address: the local address of the other router
-
System > Certificates > +
- Name: CA-Template
- Common Name: public IP of the router
- SAN: IP
-
System > Certificates > +
- Name: Server-Template
- Common Name: server
- SAN: IP
-
System > Certificates > +
- Name: Client-Template
- Common Name: client
- SAN: IP
certificate sign CA-Template ca-crl-host=192.16.12.1 name=myca
certificate sign Server-Template ca=myca name=server
certificate sign Client-Template ca=myca name=client
certicicate set server trusted=yes
certificate set client trusted=yes
certificate export-certificate myca export-passphrase=12345678
certificate export-certificate client export-passphrase=12345678
- PPP > Interface > SSTP Server > Certificate: server
- On the branch router:
-
PPP > Interface > + > SSTP Client > Dial Out
- Connect to: public IP of main router
- User: the username
- Password: the password
- System > Certificates > Import > myca.crt
- System > Certificates > Import > myca.key
- System > Certificates > Import > client.crt
- System > Certifiicates > Imports > client.key
- PPP > Interface > SSTP > certificate: client
- Add a route to the local network on each router (IP > Route)
Client to Site Configuration:
- PPP > Interface > SSTP Server
- PPP > Secrets > +
-
System > Certificates > +
- Name: CA-Template
- Common Name: public IP of the router
- SAN: IP
-
System > Certificates > +
- Name: Server-Template
- Common Name: server
- SAN: IP
-
System > Certificates > +
- Name: Client-Template
- Common Name: client
- SAN: IP
certificate sign CA-Template ca-crl-host=192.16.12.1 name=myca
certificate sign Server-Template ca=myca name=server
certificate sign Client-Template ca=myca name=client
certicicate set server trusted=yes
certificate set client trusted=yes
certificate export-certificate myca export-passphrase=12345678
certificate export-certificate client export-passphrase=12345678
- Import the client and server certificates to the Windows PC into Trusted Root Certification Authorities
PPPoE
- Point-to-point over Ethernet is a layer 2 protocol
- It is often used by ISPs to control access to their networks
- It can be used as a method of access on any layer 2 technology, such as 802.11 or Ethernet
- You cannot reach a PPPoE server through routers. Since its layer 2 protocol, the server can only be reached through the same Ethernet broadcast domain on which the clients are
- IP > Pool
- PPP > Profiles > + > change tcp mss yes
- PPP > Secret
- PPP > PPoE Servers
- On the other router > PPP > PPoE Scan
- On the other router > PPP > Interface > PPPoE client
L2TP Ports and Protocols
https://serverfault.com/questions/451381/which-ports-for-ipsec-lt2p
- Protocol: UDP, port 500 (for IKE, to manage encryption keys)
- Protocol: UDP, port 4500 (for IPSEC NAT-Traversal mode)
- Protocol: ESP, value 50 (for IPSEC)
- Protocol: AH, value 51 (for IPSEC)
Firewall
Basics
- Stop unauthorized access
- Block unwanted ports
- Classify and mark connections and packets for QOS or Routing policy
Firewall functions:
- Filter packets using filter rules
- NAT: SRCNAT and DSTNAT to translate source and destination addresses
- Mangle: to mark connections and/or packets
- RAW: drop or bypass packets before reaching the connection tracking
- Service ports: using NAT helpers
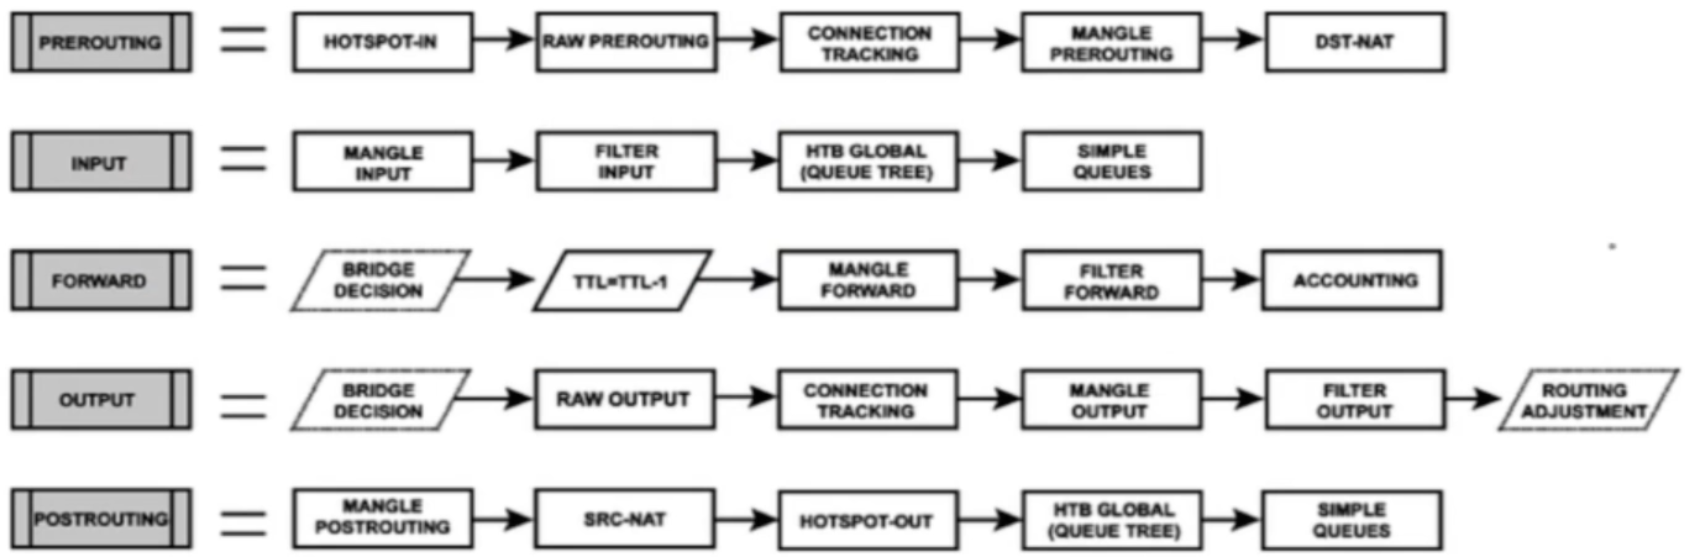
Chains:
- Input = to the router
- Output = from the router
- Forward = via the router
Firewall Basics:
- Rules processed in order
- If ... then
- If not matched, then packet is accepted
Firewall Actions:
- Passthrough = count packets/bytes
- Drop = discard a packet
-
Reject = discard a packet but send ICMP message or TCP reset
- TCP reset kills a TCP connection instantly
- Tarpit = send ACK flag but dont open the connection
Layer 3 Chains
Connection States
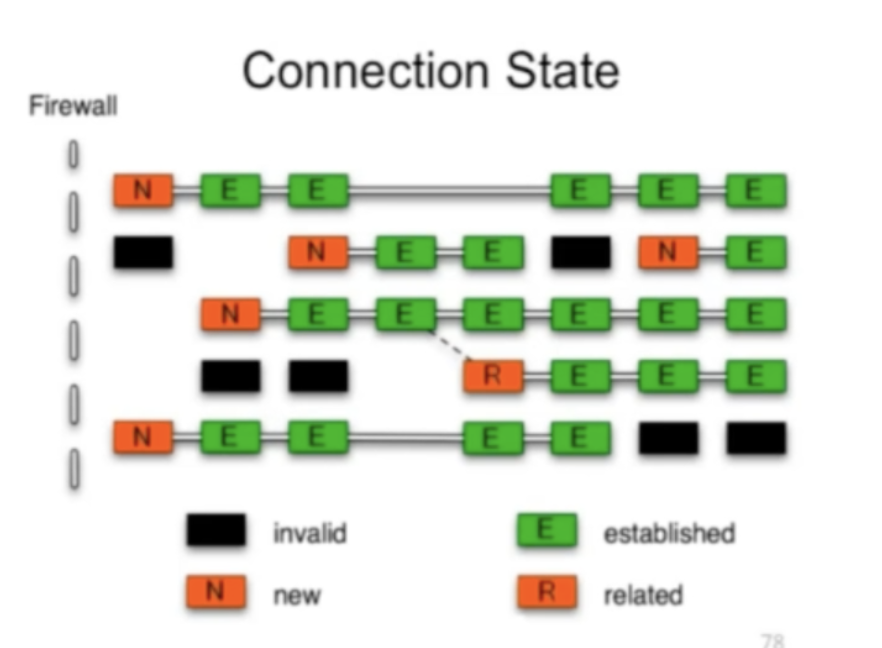
- New: The 1st packet observed by the firewall will be new. The firewall will check the packet and if allow then the next packet going to the other direction of that stream will create an established connection
- Established: a stream of packetstaht successfully pass both directions of the firewall. Established backets will not be evaluated by the firewall.
- Related: they are not considered part of the connection itself but related to it.
- Invalid: packets arrived out-of-order to the router or with invalid sequence number. Advise to drop them always.
Rules
- IP > Firewall > +
- Forward rule > Established, Related, accept
- Input rule > Established, Related, accept
- Forward rule > Invalid > drop
- Input rule > Invalid > drop
- Forward rule > allow local lan
- Input rule > local lan accept
- Forward rule > drop anything else
- Input rule > drop anything else
Redirect DNS to Router's DNS
- IP > DNS > Allow Remote Requests
- IP > Firewall > dstnat > protocol tcp&udp 53 > action redrirect 53
- IP > DNS > cache
Destination NAT
-
IP > Firewall
- chain: dstnat
- Protocol: 6 (tcp)
- Dst port: 80
- Action: dst-nat
- To Address: 172.16.1.254
- To Ports: 80
FastTrack
FastTracked packets bypass firewall, connection traffic, simple queues, queue tree with parent=global, ip traffic-flow (restriction removed in 6.33), IP accounting, IPSec, hotspot, universal client, VRF assignment, so it is up to admin to make sure FastTrack doesnt interfere with other config
- Queues > 1M / 1M (on all IPs - so all PCs connected get only 1Mbps)
-
IP > Firewall > Mangle
- Chain: forward
- Src Address: 192.168.88.2
- Action: mark connection
- New Connection Mark: PC-conn
-
IP > Firewall > General
- Chain: forward
- Connection Mark: pc-conn
- Action: fasttrack connection
QoS
Simple Queue
-
Simple queues limit bandwidth to:
- client upload
- client download
- client aggregate (download and upload)
-
Simple queue is applied to a target (mandatory) which can be:
- An IP Address
- A network subnet
- an interface
- Simple queues work in sequence which means that each packet must go through every simple queue until a match occurs
- Destination is where the target's traffic is aimed and it is not compulsory as the target
- Queue > Simple Queue > +
- Tools > Bandwidth Test
Burst
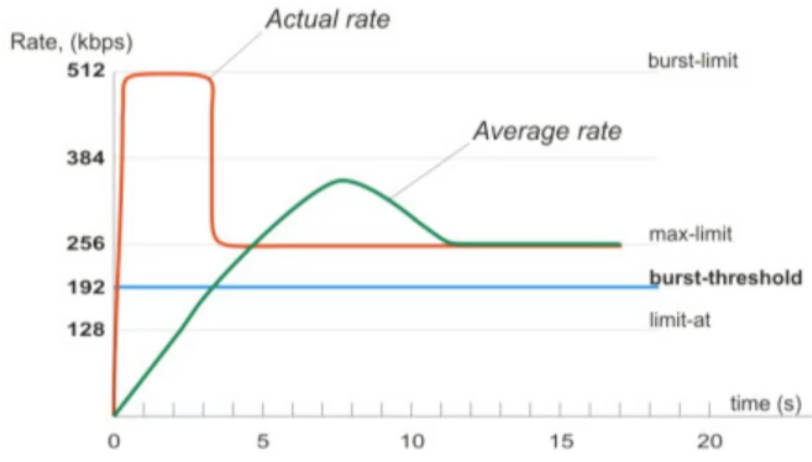
- Burst is important to give extra bandwidth limited time
- Burst Limit = 512K
- Threshold = 192K
- Time = 8s
-
First client gets 512Kbps for 3 seconds because:
- 1 sec = 64K (less than threshold then burst is possible)
- 2 sec = 128K (less than threshold then burst is possible)
- 3 sec = 192K (equal to the threshold then burst end)
-
Queue > Simple queue > General > +
- Max Limit: 3M
- Burst Limit: 5M
- Burst Threshold: 2M
- Burst time: 10s
Bandwidth limit divided by time. On the first second you'll get 500Kbps extra, etc. until the Burst Limit is reached. Then the speed will go back to normal.
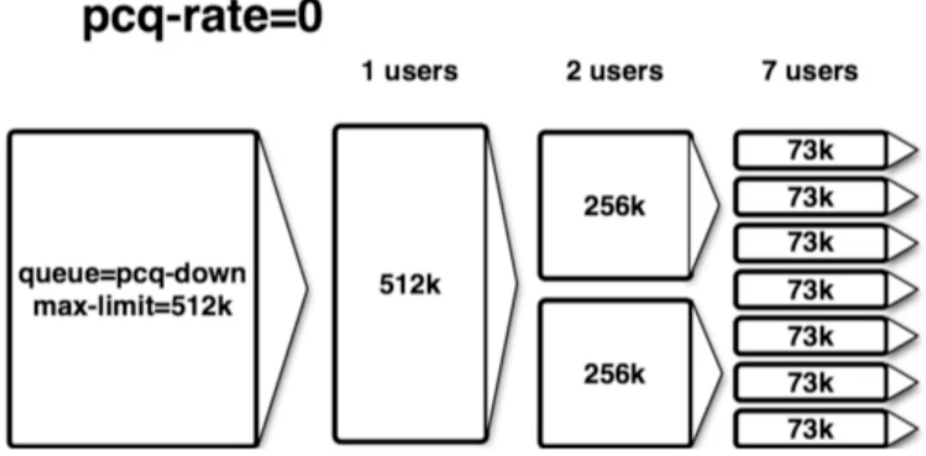
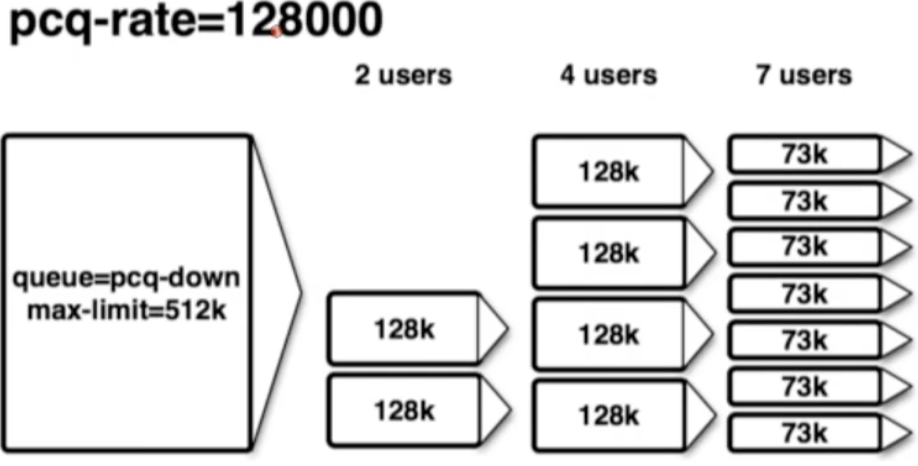
Per Connection Queue (PCQ)
-
Queues > Queue Types > copy pcq upload
- Type Name: PCQ Upload
- Rate: 0
-
Queues > Queue Types > copy pcq download
- Type Name: PCQ Download
- Rate: 0
-
Queues > General > Simple queue > +
- Queue Type: PCQ Upload/Download
Tools
Ping
- Tools > Ping
Traceroute
- Tools > Traceroute
Profile
- Tools > Profile
Emails
- Tools > Email
Netwatch
-
Tools > Netwatch > +
- Up: /tool e-mail send to=calebsargeant@gmail.com subject="Router is up" body="Router is up on $[/system clock get time]"
- Down: /tool e-mail send to=calebsargeant@gmail.com subject="Router is down" body="Router is up on $[/system clock get time]"
Monitoring
Torch
- Tools > Torch
Graphing
- Tools > Graphing > Interface rules
- Tools > Graphing > Resource rules
- http://ip of mikrotik/graphs
The Dude
- Dude > Settings
- Install the dude on your PC
- Open it up and click discover, put in your subnet
Wireless
Terminology
What is wireless?
- RouterOS supports various radio modules that allow comminication over the air (2.4GHz and 5GHz)
- MikroTik RouterOS provides a complete support for IEEE 802.11a, 802.11b, 802.11g, 802.11n and 802.11ac wireless networking standards
Wireless standards
- IEEE 802.11b - 2.4GHz frequencies, 11Mbps
- IEEE 802.11g - 2.4GHz frequencies, 54Mbps
- IEEE 802.11a - 5GHz frequencies, 54Mbps
- IEEE 802.11n - 2.4GHz - 5GHz 150Mbps (300Mbps)
- IEEE 802.11ac - 5GHz frequencies 1Gbps

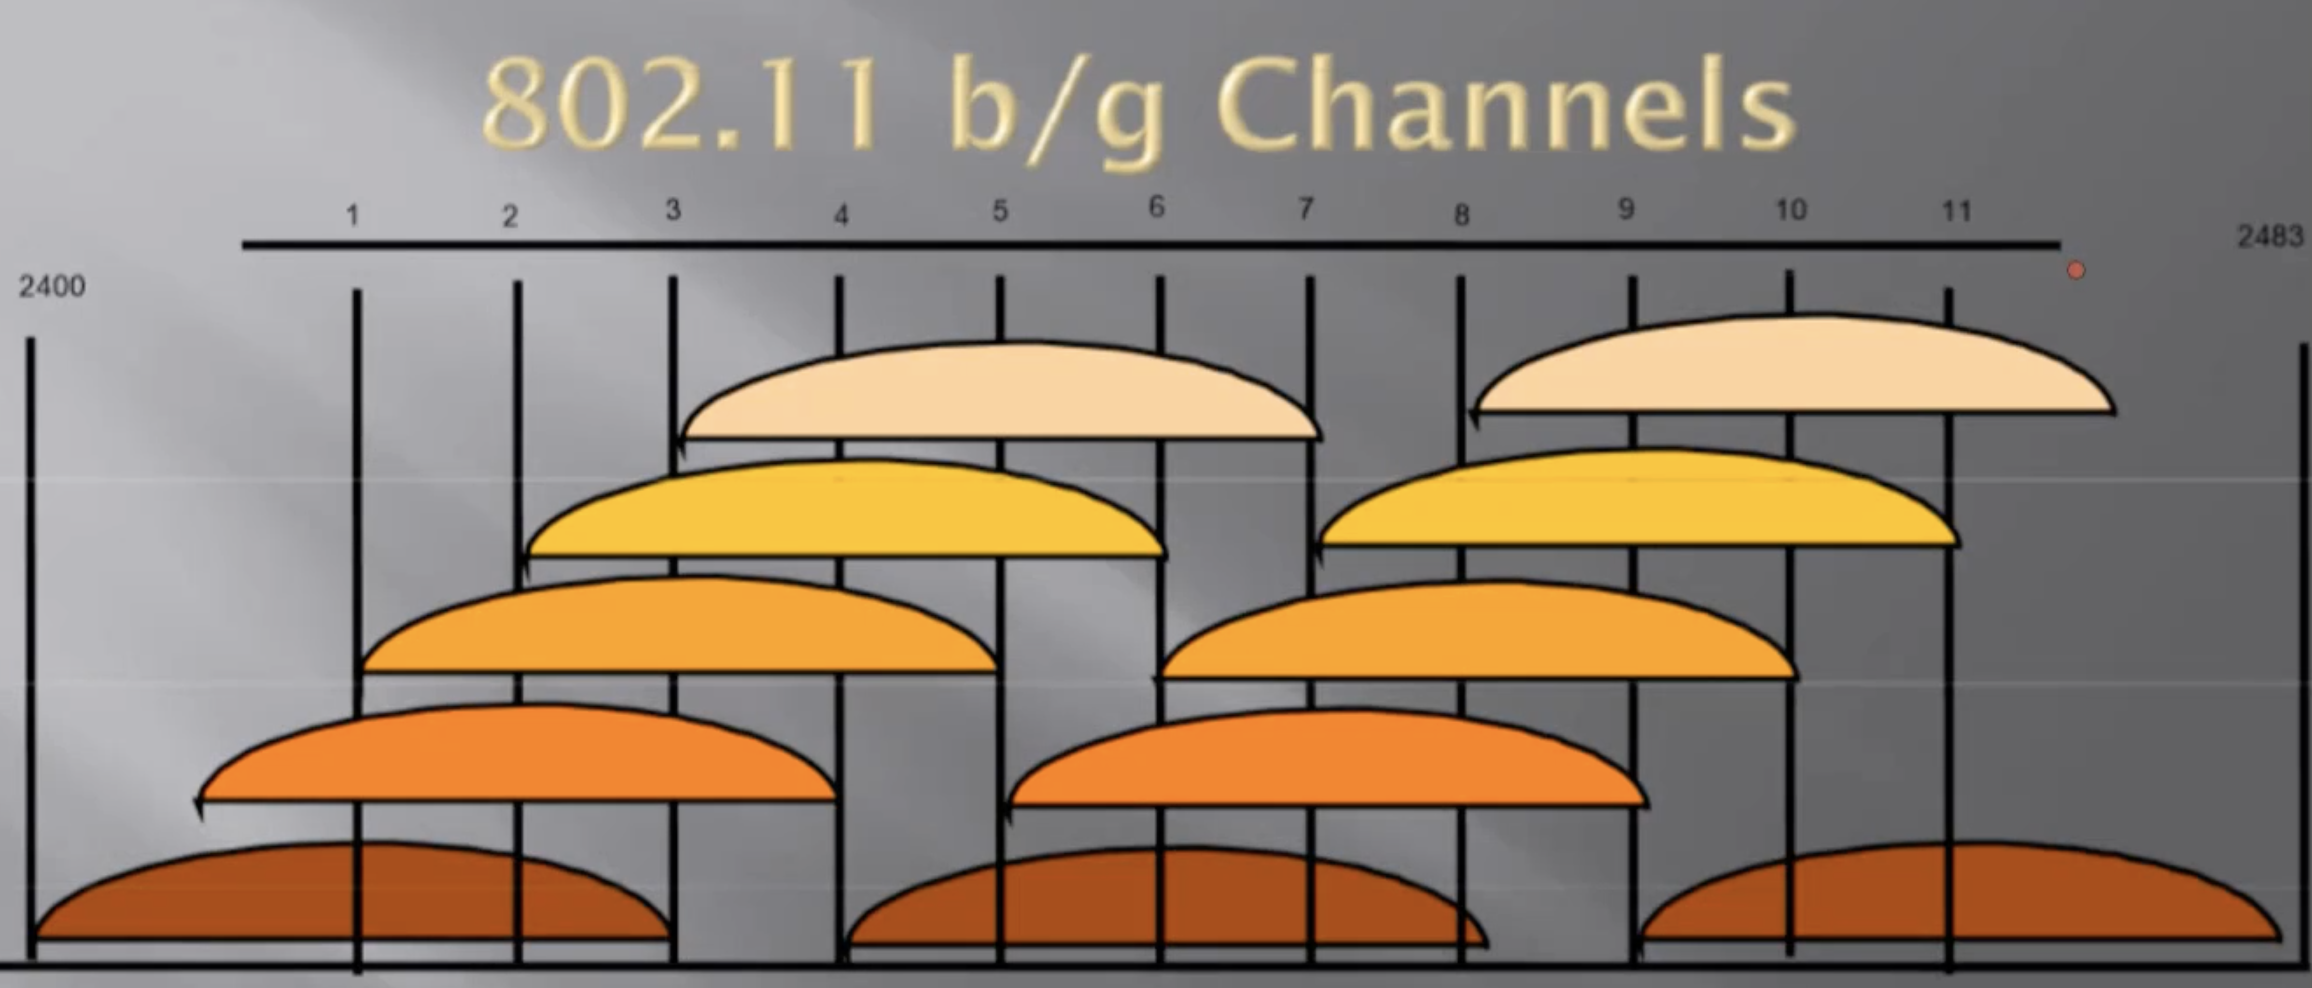
- 802.11b,g frequency range
- Channels 1,6 and 11 non-overlapping
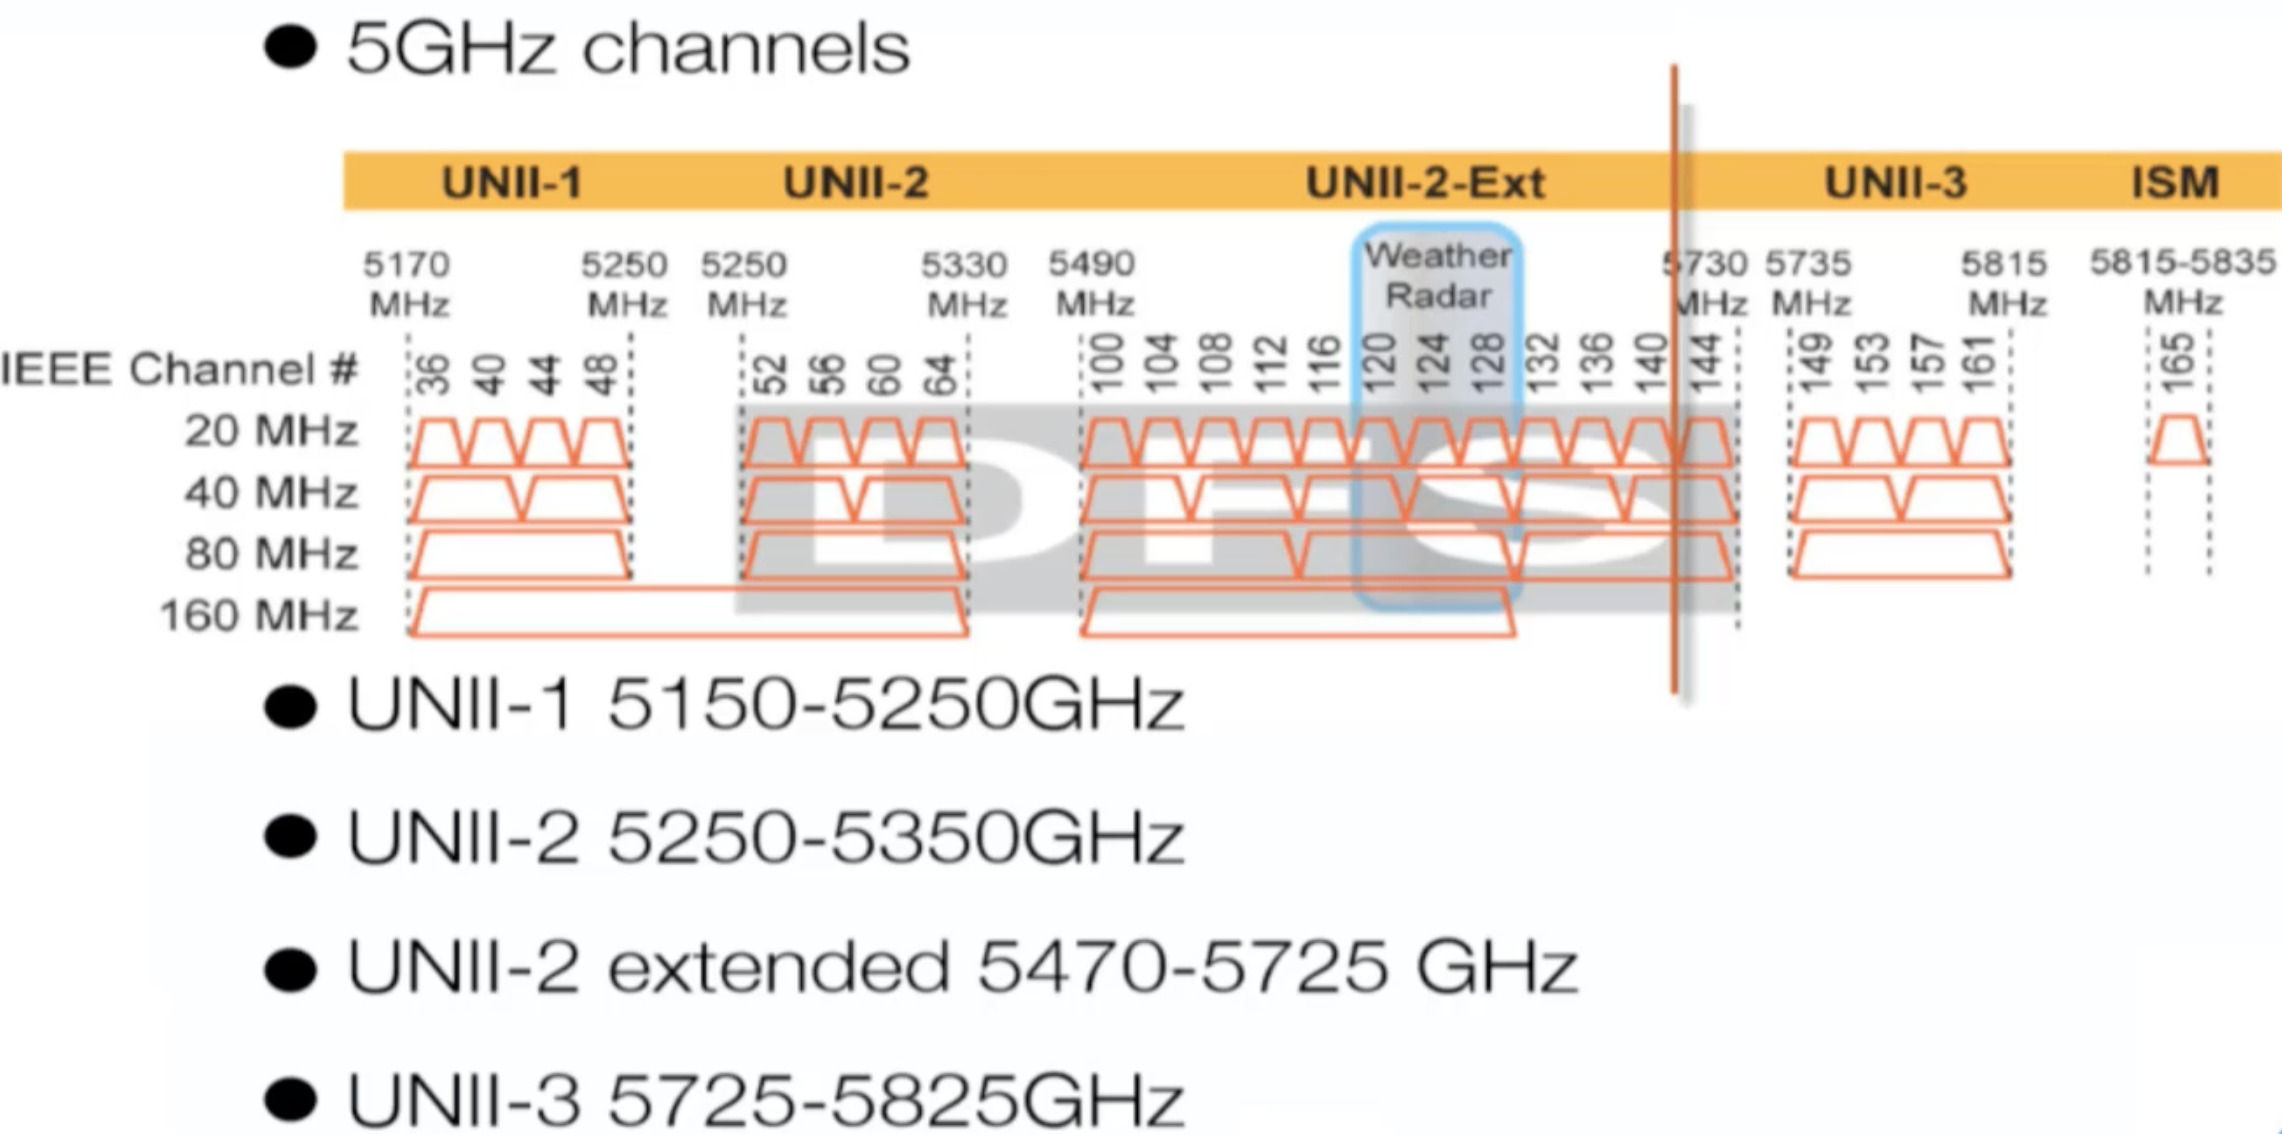
Supported Frequencies
Depending on your country regulations wireless card might support
- 2.4GHz: 2312 - 2499 MHz
- 5GHz: 4920 - 6100 MHz
Setup
- Wireless > Security Profiles > +
- Wireless > WiFi Interface > enable and configure, select the Security Profile
- you can use freq usage to check which frequency has little usage
- you can use Snooper to see what's connecting via wifi
Station
Make the router a client (nobody connected to that router can get internet)
- Wireless > mode station
Mac Filtering
Default Authenticate allows clients to authenticate. Turning it off you must use Wireless > Access list to allow certain clients to access your wifi.
Default forward disabled prevents wifi clients from communicating to each other in the wifi.